| Rendering/ Volumetric Rendering |
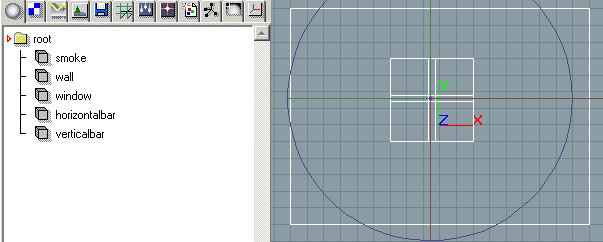
Volumetric RenderingVolumetric rendering allows you to visualize fog, smoke, fire and other atmospheric effects. For example, a light source can illuminate a fog cloud. Objects can cast shadows through a fog cloud, just like in the real world. Defining such effects is simple and logical: first a suitable volumetric object shape is created, then a suitable material is applied to it. The program takes care of the rest. In other words, properties of foggy and gaseous objects are defined and controlled exactly the same way as properties of 'solid' objects: using materials. The 'Materials' chapter explains how to build fog-like materials. This section demonstrates how you can use them in your scenes. Defining volumetric properties of geometric objectsIn the first example we will create a dark room filled with smoke. Light shines through a window, illuminating the smoke and casting shadows through it. Tutorial level: Medium Sample project: 'tutorprojects\rendering\smokyroom' 1. The first task is to model the room, or actually only one wall with a window, which is enough to show the effect. Take a front view and turn grid drawing and snap to grid on. 2. Go to the Analytic tab and select the analytic cube tool. Draw a large cube filling most of the view window. Using the select window's 'Rename' tool (you can find it from Geometric Objects tab popup menu), rename the cube as 'smoke'. 3. Create 4 more analytical cubes as shown on the image below. The first new cube should have the same size as the 'smoke' cube, because it will be the back wall behind the smoke. The second cube is the window in the middle of the wall. The third and fourth cubes are the window bars. Rename the cubes as you create them to make identification easier.
4. Take a side view. All the cubes we just created overlap each other and their thickness is not correct. Select 'smoke', and using either the Extend tool or the scale handles, increase the thickness of the smoke so that it fills at least half of the view window. Then move it to the right side of the other cubes either using the move handle or the Move tool. Note: Leave a thin gap between the smoke and the other cubes. Always avoid situations where two surfaces (the smoke and the wall in this case) overlap exactly. Otherwise the rendering engine gets inconsistent results in computing where the fog ends and the wall starts. Remember that computers have finite accuracy. The gap can be very small, only a fraction of one millimeter. You may have to disable grid snapping temporarily to be able to position the smoke at a small distance from the wall. 5. Then select 'wall', 'window' and the two window bars. Move them into position, if necessary. Use the extend tool (or the scale handle) to make them somewhat thinner. Remember to maintain a suitable thin gap to the smoke. 6. Select the 'window' and increase its thickness slightly, so that it sticks out from the wall. We will use it for cutting a hole to the wall, and it should cut all the way through. 7. Select 'wall', then holding the Shift key down, add 'window' to the selection. Then activate the Boolean tool from the 'Boolean' tab of the toolbar. Click on the 'Remove'icon, then click Accept. Now the window cuts a hole in the wall. 8. The default wireframe representation of the window is quite bad. If you like, you can improve it in the following way: Select the 'wall & !window' level. Then open the hierarchy of the level, select the original 'wall' and 'window' objects and clear 'Invisible in real time rendering' property from the 'Gen' tab. Close the property window. 9. Let's clean up the hierarchy a bit. Multi select the 'wall & !window' level and the two window bars. Then apply 'Drop to a Level' from the popup menu. Rename the created level as 'wall'. The structure of the scene is now almost ready.
9. Select the 'smoke' object. Go to the Materials tab of the Select window and drag & drop the 'shadowfog' material onto the view window. 10. Take a side view and zoom out. Go to the 'Light Sources' tab and activate, for example, the 'Point' tool. Click behind the room so that the light will shine through the window to the room (don't put the light above the room, because there is no ceiling). Click towards the room a second time to finish the light source. Rename it to 'Sun'. 11. Make sure that the view uses 'reasonable quality' or 'quality over speed' rendering settings. If not, drop either of them or another suitable rendering settings object to the view. Take a perspective view. Zoom and rotate the view so that you can see the interior of the room in a suitable way. Then click the 'Render' button. 12. It may happen that you do not see the fog, or the fog looks much too bright. The reason is that shading of most fog like materials strongly depends on the scale of the model. A big cloud in the sky can be several kilometers thick and can hide a bright object like the sun. A smoke from a candle is a couple of centimeters thick and hardly visible at all. To change the strength of the smoke shading, select the 'shadowfog' material in the Material tab of the select window, and open the property window. Increase the 'Turbidity' property to make the fog thicker. You may also change the 'Color' of the fog to light blue. 13. The accuracy of the shadow appearing in the smoke can be improved by increasing the 'Sampling' value in the property window of the material. This may be necessary if the object casting the shadow has small details (such as thin window bars). For example, set the 'Sampling' to 20. The higher the value the better the quality (and the slower the rendering). Advanced users may add random variation to the sampling positions using VSL (see 'additive fog' VSL example for details). Together with adaptive anti-aliasing, this method produces accurate high quality shadows with a reasonably low sampling rate. 14. If the smoke still appears too weak, you can increase the brightness of the light source. Select the 'sun' light and use the 'Intensity' slider in the property window's 'Spec' tab. Try values ranging from 1 to 2. You may also create a new, weaker light source on the top of the room to simulate a light bulb in the ceiling.
The example project 'smokyroom' uses the randomized sampling method mentioned above for improving shadow accuracy. You can re-use the material in other scenes. To render a high quality still image, select 'Stochastic' anti-aliasing at level 2 or higher and set anti-aliasing threshold to 5 or lower. This ensures that fog effect computations are made very accurately on areas where fog illumination changes rapidly.
Fog cloudsTutorial level: Medium Sample projects: 'tutorprojects\rendering\fogcloud' and 'tutorprojects\rendering\irregularcloud' You can simulate a fog cloud the same way as smoke in the previous example. Often a fog cloud is not homogeneous: there are dense areas and clear areas quite randomly. This effect can be achieved in two ways: 1. Use one big object (e.g. a flat ellipsoid) to model the fog cloud and apply a material, which defines a varying density. The density function must be carefully designed to hide the symmetric shape of the ellipsoid. The image below shows an example.
2. Model an irregular shape using metaballs or subdivision surfaces. Remember to set high enough recursion depth under the renderings settings tab (10 in the example below).
The fog material can be self-illuminating ('plasma') or diffuse-illuminated ('shadowfog'), or the combination of the two. A note for users of previous Realsoft products: In Real 3D, overlapping areas of transparent objects, which shared the same material, were automatically 'melted' together. This does not happen in Realsoft 3D. For example, using a large set of analytical spheres for representing an irregular fog cloud does not produce a good result, because the 'thin seams' between spheres usually affect the shading. Use the metaball object for this kind of applications.
Global atmospheric effectsGlobal atmospheric effects, such as a global fog, can be created easily with the Creation/Atmosphere tool. This tool creates an object, which defines volumetric properties for the entire (infinite) space. Tutorial level: Beginner Sample project: 'tutorprojects\rendering\globalfog' To create a global fog: 1. Activate the 'Atmosphere' tool from the 'Light sources' toolbar tab. 2. Select a 'fog' material from the material list in the tool control bar. 3. Click 'Accept'. You have now defined a global fog. 4. Create a couple of spheres at different distances and render. The higher the distance, the better the fog obscures the spheres.
Note: use only self-illuminating, homogeneous fog materials with the global fog. The shading of other kind of fogs is performed with a finite amount of samples, which are not suited to the infinite nature of the global fog object.
Visible lightsThe spotlight tool allows you to select a volumetric material, which will visualize the light beams. Tutorial level: Beginner/Medium Sample project: 'tutorprojects\material\visiblespot' 1. Go to the 'Light Sources' tab of the toolbar and activate the Spot Light tool. 2. Select one of the materials available in the material list of the tool control bar. The list shows only those materials of the current library, which define volumetric effects. If the list is empty, all such materials have been deleted, and you should reload the standard material library. Select 'shadowfog'. 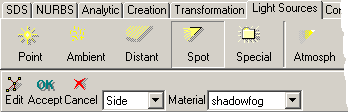 Creating a spot light with a fog material 3. Define the spot light geometry as usual. 4. Place an object inside the light cone so that it will cast a shadow. 5. Render. If the light beam is not visible enough, double click the 'shadowfog' material in the Material tab of the select window and double the 'Turbidity' value in the opened property window. Test render and increase 'Turbidity' again until a suitable effect is achieved. 6. The sample image below shows growing brightness as the thickness of the beam increases. This can be changed by selecting 'Falloff' = 'Distance' or 'Falloff' = 'Distance squared' from the spotlight's 'Spec' controls on the property window.
If you now look at the select window's object geometry tab, there are no material mapping objects at all. The reason is that a spotlight can have a material as a direct attribute. If you open the property window and go to the spot light's 'Spec' properties, you can see that there is a 'Material' gadget available. From the gadget you can change the material or disable it by selecting the empty entry of the list. In the sample project, 'tutorprojects\material\visiblespot', an additive fog material, which is described in the 'Fog examples' section of the VSL tutorials, is applied to a spotlight. Because of its additive nature, the illuminated fog never darkens objects behind it and is therefore especially suitable for lighting simulation.
Volumetric fireFire can be simulated using suitable materials. Let's experiment using the 'Fire' material in the default material library. Level: Medium Sample project: 'tutorprojects\rendering\simplefire'
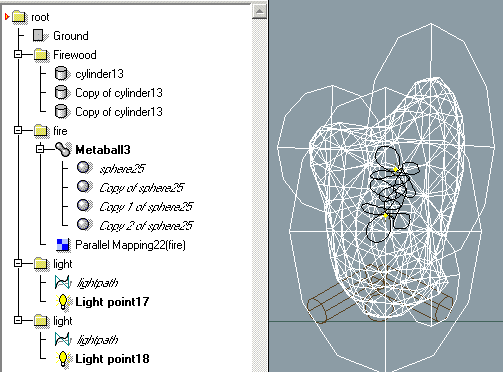
1. Create a green analytic rectangle defining the ground level and rename it to 'Ground'. Create a pile of brown analytic cylinders representing firewood above the ground. Drop the cylinders to a level and rename the level to 'Firewood'. 2. We could use a simple elliptic sphere to define the volume of the sphere. However, a more interesting result can be obtained using metaballs. Go to the geometric objects tab of the select window and select 'New/Metaball´ from the popup menu. 3. Double click the created metaball object in the select window to open the property window. Go to the 'Spec' tab and set each of the 'Resolution X', 'Y' and 'Z' sliders to a value between 10 and 15. The surface of the metaball structure does not have to be smooth because only volumetric shading will be applied to it. Decreasing resolution will improve rendering speed. Set 'Field' to 'Quadric' (smooth blending of metaballs) and 'Iso Value' to '0.4' (to fill most of the volume of metaballs). Activate the 'Simulation' checkbox on the top part of the 'Spec' tab. We will animate the metaballs using a gravity field later. 4. Create an analytic sphere above the firewood. The size of the sphere may be one quarter of the size of the total fire. Create 3-6 more spheres around it at random positions. The spheres should partially overlap. You may stretch some or all of the spheres vertically higher so that the shape looks more like a flame. 5. Select the first sphere. Open the property window, go to the 'Sim' tab and set 'Gravity' to 'Cause'. The center sphere will create a gravity field in which the other spheres pulsate. Switch to The 'Phys' tab and set mass to 100 000 000 (number 1 and eight zeros = one hundred million) kilograms. A gigantic mass like this is necessary, because Realsoft 3D uses real world units in simulation. Two apples on a table do not attract each other much, do they? Only a planet-scale mass is sufficient to create a noticeable gravity field. 6. Select all the other spheres. Their default masses are OK, but go to the 'Sim' tab and set 'Gravity' to 'Affected'. These lightweight spheres will bounce around in the gravity field caused by the heavy center sphere. 7. Select all the spheres, and drag & drop them to the metaball level on the select window. An irregular 'meta' surface appears. Edit the spheres inside the metaball level if the shape is not good enough. After that, if you like, you may set the actual spheres 'Invisible in real time rendering' in the property window 'Gen' tab, to clean up the wireframes. 8. Select the metaball object. Drag the material 'Fire' from the Select window's Materials tab to the view window. This creates a new level, rename the level to 'fire'. 9. Increase 'Recursion depth' of the rendering settings used to at least 6 and test render to see how the fire looks. If the brightness of the fire is too low, open the property window and increase the 'Flame saturation' value of the fire material. The 'Flame density' attribute defines how big part of the fire volume becomes filled with flames. Too high a value fills it completely, and reveals the original shape of the fire volume clearly. This is undesirable if the volume is relatively simple. You may also adjust the size of the fire parallel map to change the size of flames appearing in the material. 10. The fire is supposed to cast light to its environment. Therefore, create two point light sources inside the fire. Change the color of light sources to a suitable light yellow. One of the light sources can be non-shadow casting (property window's 'Spec' tab/'Shadow Casting' set to 'No shadows') to save some rendering time. Create two closed nurbs curves traveling around in the fire (see the figure below). Multi select the first light source and the first nurbs curve (in this order). Then select 'Animation/Path/Move' from the main menu bar. Then drop the light source and the curve to a level. Do the same for the second light source and curve. The light sources follow the paths, casting changing shadows around (If set back on).
The simple fire scene is now ready. Play the animation to see animated fire. If the fluctuation of the metaball shape is too slow, increase the mass of the center sphere. Decrease the mass if things happen too rapidly. A ray traced preview rendering to an AVI file shows another animation effect: the material defined flames also change and travel upwards. You can control the speed of this effect using the 'Flaming speed' attribute of the fire material. The workflow above shows only the basic ideas for a simple fire. The realism can be improved in many ways: adding new material details, more metaballs, etc. In the 'simplefire' sample project the 'Volume properties' shader was duplicated, changed to a 'Surface filtering' shader and edited slightly. The new shader filters the color of the light sources inside the fire with the color of the flames. This makes illumination of the environment much more interesting and realistic.
Rendering settings and volumetric effectsMost of the default rendering settings are suitable for rendering volumetric effects. Only the draft quality settings ('speed over quality') are too simple for this purpose. The general guidelines are:
|


 |
 |